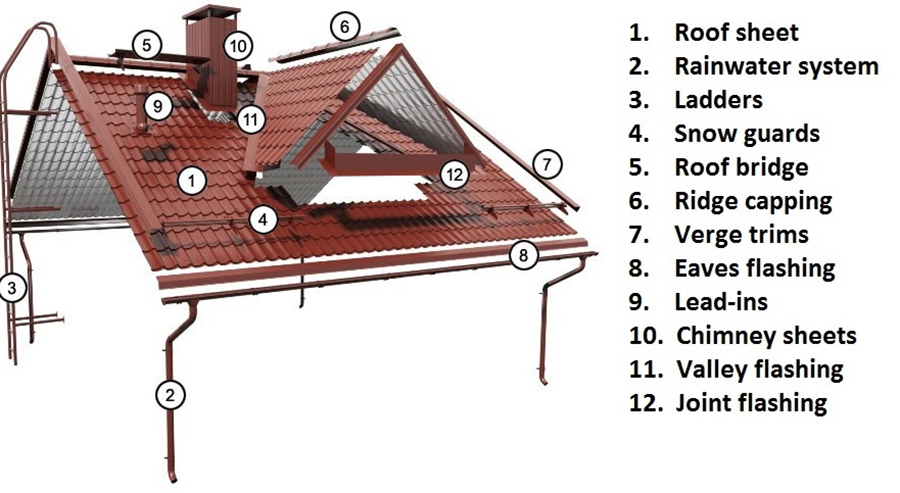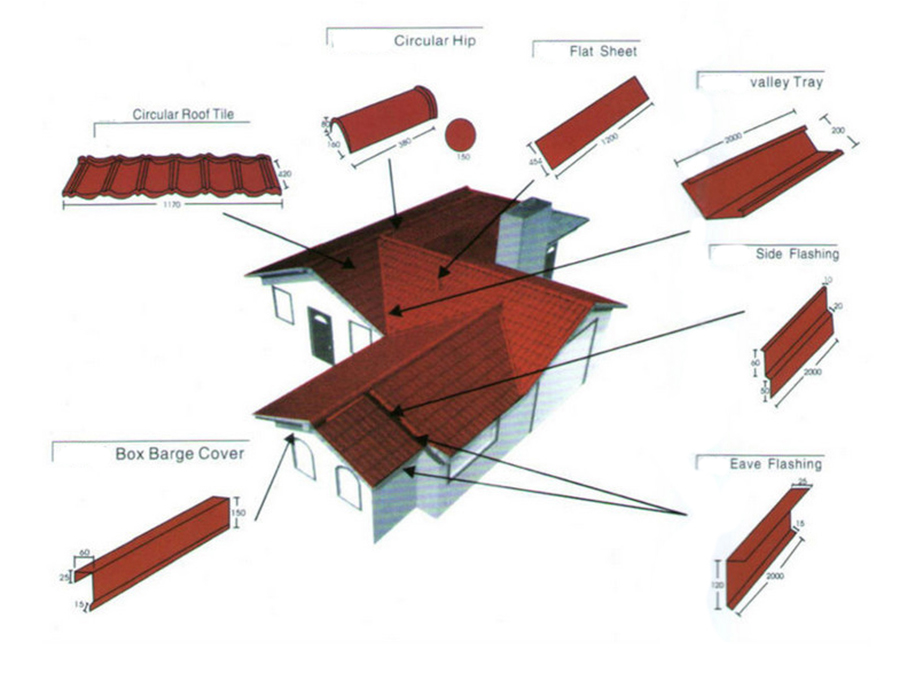
As we all know that roof flashing is a slender metal layer that diverts the flow of water where the roof meets vertical surfaces such as walls or dormers. Flashing is typically made of galvanized steel, copper, or aluminum, and it surrounds vents, chimneys, and skylights. Essentially, flashing is a waterproof seal that keeps water on the roof shingles rather than allowing it to seep into the roof deck.
Without proper flashing, water may infiltrate the gaps between walls and the roof, potentially causing damage to the interior of the house. Since roof flashing is so important, how to installed it?
To install roof flashing, first plan the flashing layout and cut pieces to size, ensuring they are compatible with the roofing system. Install starter flashing like drip edge at the eaves and valleys. Layer flashing with panels using a shingle-like overlap, beginning with the underlayer and moving up. Secure with appropriate fasteners every 8–10 inches and seal all joints, edges, and seams with quality sealant or tape to prevent leaks.

Preparation & Layout
1. Plan the Flashing
Identify all areas that require flashing, such as valleys, eaves, and where the roof meets vertical surfaces like walls or chimneys.
2. Prepare the Surface
Clear the roof area of any debris, dirt, or loose materials where the flashing will be installed.
3. Cut Flashing
Use metal snips or a shear to cut flashing pieces to the required lengths, allowing for necessary overlaps.
4. Label Pieces
To stay organized, label each flashing piece to know its specific location.
Installation Steps
1. Install Starter Flashing
Begin at the roof eaves and valleys, installing drip edge and valley flashing first to direct water away from the structure.
2. Layer Flashing and Panels
Flashing must be installed in layers, going underneath upper layers of roofing and above lower layers. For instance, install step flashing and base flashing where roof planes meet vertical surfaces.
3. Create Overlaps
Ensure all overlapping flashing pieces are installed in a shingle-like pattern to prevent water from penetrating through the overlaps.
4. Install Closures
Use closure strips (foam or butyl tape) in vented areas to prevent water and debris entry, sealing the top of panels or trim pieces.
5. Secure with Fasteners
Tightly secure flashing with roofing nails or screws, spacing them approximately every 8–10 inches. Fasten flashing to withstand wind pressures and thermal movement.
6. Seal Joints
Apply high-quality sealant or caulk along all joints, edges, and seams to create a watertight seal and prevent leaks.

Final Inspection
1. Test for Leaks
After installation, spray water on the flashing areas to check for any signs of water intrusion or leaks.
2. Check for Issues
Inspect the flashing for any loose edges, misaligned sections, or improperly fastened areas.
3. Reinforce if Necessary
Reinforce any suspect areas with additional fasteners or sealant as needed to ensure the integrity of the installation.
Properly installed roof flashing is crucial for a watertight and long-lasting roof. Always prioritize safety and use the correct materials and techniques for your specific roof type. If you are unsure about any step, consult a professional roofer to ensure the job is done correctly and your home remains protected from water damage. A well-sealed roof protects your investment for years to come.
If you have any questions,please contact the Yumisteel team for tailored solutions!Thank you!
years of experience
 online service
 +86-592-6095031
 manager@yumisteel.com
 Alina_Yuki
 +8613559086380
 +8615860744964